Difference between revisions of "Anarchi"
(→Introduction) |
(→Weapon Systems) |
||
| (117 intermediate revisions by 4 users not shown) | |||
| Line 1: | Line 1: | ||
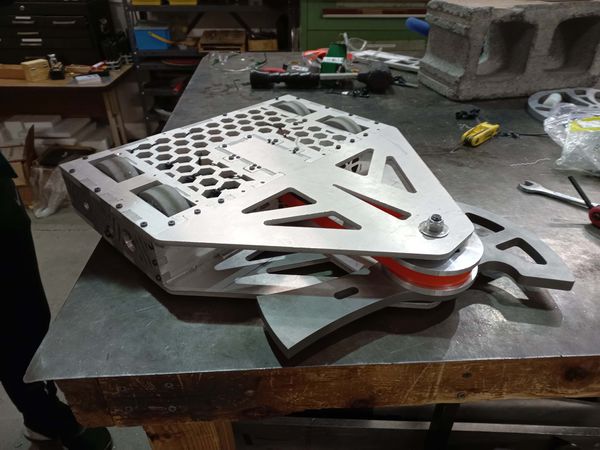
| + | [[File:Anarchi_1.jpg|right|thumb|600px|Fully Constructed Anarchi]] | ||
== Introduction == | == Introduction == | ||
Anarchi was supposed to be an experimental 30lb bot where it's primary weapon could be switched between a horizontal spinner and a drum spinner via weapon modules that would be held by the chassis using a modular interface. Unfortunately, due to the poor member retention throughout the semester, the team was unable to manufacture the drum spinner module and was only able to finish the horizontal spinner module before competing in AVC 2022. | Anarchi was supposed to be an experimental 30lb bot where it's primary weapon could be switched between a horizontal spinner and a drum spinner via weapon modules that would be held by the chassis using a modular interface. Unfortunately, due to the poor member retention throughout the semester, the team was unable to manufacture the drum spinner module and was only able to finish the horizontal spinner module before competing in AVC 2022. | ||
| Line 8: | Line 9: | ||
*Jackson Isenberg | *Jackson Isenberg | ||
*Lucas Luwa | *Lucas Luwa | ||
| + | |||
| + | == Chassis == | ||
| + | |||
| + | === Main Chassis === | ||
| + | |||
| + | The main chassis is a basic rectangular frame of 3/8" Aluminum 6061. Bolts put the entire frame together in various directions to avoid shear upon collision. Each side of the robot was covered with plates for protection. The chassis was designed with strength and stability being the biggest priority, since we felt that the weapon would be a weak point due to the necessary modularity. | ||
| + | |||
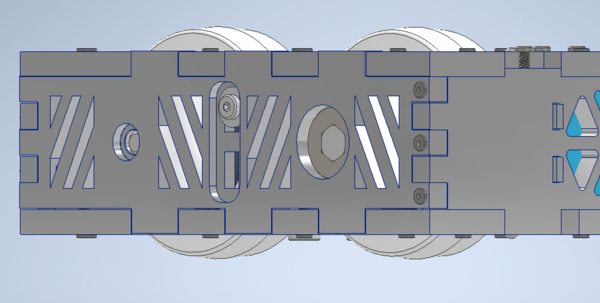
| + | The biggest problem the chassis has is that, in order to try and make it as sturdy as possible, the number of box joints used was absurdly overkill. This led to it being incredibly difficult to remove a plate for an access point to the electronics and motor gearboxes. | ||
| + | [[File:AnarchiChassisSideFrontPlateMesh.png|center|thumb|600px|The absurdity of Anarchi’s puzzle fits]] | ||
| + | The positive side is that the chassis structure was almost completely unscathed after competition, but it made it impossible to fix issues with the drive motor gearbox that cost us greatly in matches. Team should consider reaching an equilibrium between stability and replaceability. | ||
| + | The chassis’s structure and concept was designed before the final version of the drivebase. When the drivebase was finished, the chassis was iteratively updated to fit the drive system. However, electronics space was never considered until it was too late. It was always on the back of our minds but was never implemented until it was too late. This led to some bad wire congestion in our chassis that could have been mitigated by proper design and planning. | ||
| + | |||
| + | Each plate was pocketed in a certain way to represent anarchy as a namesake feature. | ||
| + | |||
| + | === Modular Interface === | ||
| + | |||
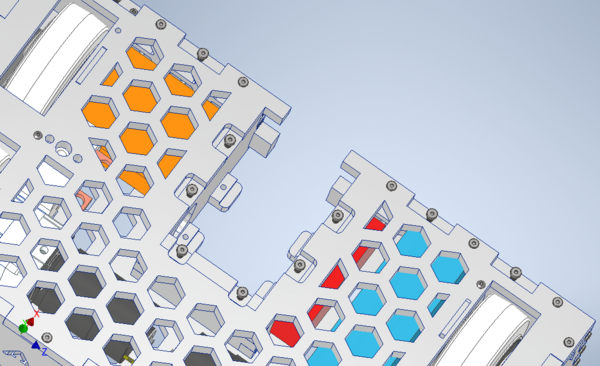
| + | The modular interface is the crux of the modular robot design. The interface was designed for the ability to slide the weapon module into the center of the robot and then attach it using bolts into threaded holes. Through this universal interfacing design, any weapon module following this interface could slide into the chassis. A benefit of this design is that is relatively simple and only requires that very simple attachment mechanism to fit any weapon module so long as it follows the universal interface design. This was (supposed to be) Anarchi's major selling point -- that the robot could work with any weapon design. | ||
| + | |||
| + | [[File:AnarchiChassisModularInterface.png|center|thumb|600px|View of the Modular Interface]] | ||
| + | |||
| + | The main problem with the interface is the fact that it requires very precise manufacturing to maintain assembly strength and allow for the weapon module to be inserted and removed easily. This became a very difficult engineering challenge, especially since we did not properly consider tolerances when designing the chassis. As a result, we had to file down the puzzle fits and interface sides in order to even fit the pieces together. | ||
| + | |||
| + | Another problem was that the interface did not consider factors such as center of mass or weapon height, which was especially troublesome when we wanted to try designing a vertical spinner. The interface was not well equipped to handle major changes in the center of mass of the robot and therefore limited what kinds of weapon were viable for the interface. | ||
== Drive System == | == Drive System == | ||
| + | === Overview === | ||
| + | {| border="1" cellspacing="1" cellpadding="1" style="width: 500px;" | ||
| + | |- | ||
| + | | Wheels | ||
| + | | Colson Performa wheels https://www.vexrobotics.com/775pro.html | ||
| + | |- | ||
| + | | Gearbox | ||
| + | | VersaPlanetary 10:1 gearboxes https://www.vexrobotics.com/versaplanetary.html | ||
| + | |} | ||
| + | |||
| + | |||
| + | |||
| + | The drive system consisted of four wheels, two on each side. The back wheels were directly driven and the front wheels were connected to the back wheels with timing belts and pulleys. The drive motor shafts, wheel hubs, and driveshafts were all hexagonal. The back wheels were mounted directly on the drive motor shaft. To constrain the wheels axially, the CAD of a timing pulley was “borrowed” from McMaster and edited such that a shoulder pressed against a bearing in the outer side plate. That bearing was pressed into a pocket so it could not slide. | ||
| + | |||
| + | |||
| + | The front wheels were assembled in the following way: | ||
| + | Inner bearing cover – Flanged bearing – Retaining ring – Wheel – Timing pulley – Retaining ring – Flanged bearing | ||
| + | |||
| + | The inner bearing covers were 3D printed parts protecting electronics from spinning things. The flanged bearings were pressed into the inner and outer side plates. The rest of the items were put on the drive shaft and sandwiched between the bearings to constrain everything axially. For both the front and back timing pulleys, 6-32 bolts were used to hold the timing pulleys to the wheels. Both the front and back timing pulleys were printed out of ABS. PLA copies as backup were also printed last minute. The timing pulleys did not break during any of the fights (aside from a small extrusion which did not affect how they functioned). | ||
| − | |||
| + | === Issues === | ||
| + | A lot :( | ||
| − | + | Below are issues roughly ranked from most severe (#1) to least severe (#7) | |
| − | + | 1. Motor shaft slipping within gearbox interface. There were a few causes. First, Vex gearboxes are not designed for combat robotics and appear to be designed to slip at a certain torque to prevent damage. Second, a key didn’t fit in the gearbox during assembly. Due to a lack of time, the short term solution was to ignore it and if it was a problem later to fix it (spoiler: It was a problem later). | |
| + | |||
| + | 2. The modular bot was in fact not very modular. After the severe lack of drive was noticed after the 2nd fight at AVC the plan was to finally address the issue. However, access to the gearbox required nearly the entire boat to be disassembled and there was not time. Make important subassemblies fast to remove to fix or replace. | ||
| + | |||
| + | 3. Retaining ring grooves in hexagonal shafts should be avoided for a number of reasons. Retaining rings are designed for specific grooves with tolerances (check manufacturer’s catalog) that are tricky to achieve in a non circular shaft. So machining them can be difficult and result in inaccurate grooves. The rings also plastically deform if they are stretched just a little past the shaft they are designed for. During competition only a single retaining ring ended up going on each shaft. | ||
| + | |||
| + | 4. Brushless motors appear to be much more common in BattleBots (for both drive and weapon). Do your research. | ||
| + | |||
| + | 5. The back and front wheels are connected by a timing belt. Initial calculations were off and the belt ended up being too loose. Here were different efforts taken to solve the issue: | ||
| + | A. Printing the next larger timing pulley on McMaster (slightly too large) | ||
| + | B. Creating and printing a custom timing pulley with one more tooth than the configuration that was too loose. This was barely too tight and the drive couldn’t be assembled. | ||
| + | C. Solution that ended up being used: creating two idlers with bushings for each side. They were able to be mounted in the outer side plate without any changes | ||
| + | Better solutions: | ||
| + | A. Do better math in the start | ||
| + | B. Have some way to tension the belt in case the math is off or the belt lengthens over time | ||
| + | C. Do things less last minute and have time to purchase another belt | ||
| + | D. Avoid belts and use chains or gears. Although each method of power transmission potentially has issues | ||
| + | 6. The center of mass was slightly in front of the front wheels instead of in between the front/back wheels. This turned out to not really be an issue. At least as far as we could tell for the short amount of time it could drive. | ||
| − | + | 7. The Drive ESC was way over-specced. Both current wise and had random features like regenerative braking. Although it did work fine, purchasing a more suitable ESC is probably better. | |
| − | + | ||
| + | TL;DR | ||
| + | Drive is important - do your research and figure out what works | ||
| − | + | == Weapon Systems == | |
| + | === Horizontal Spinner Module === | ||
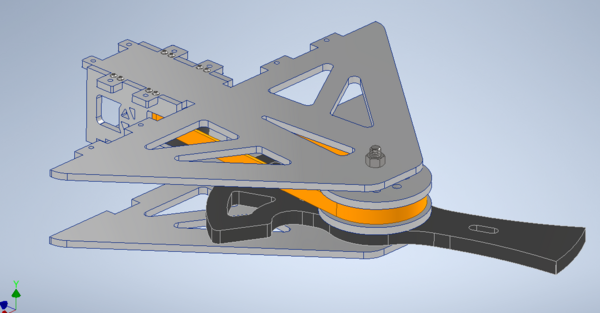
| + | [[File:AnarchiHorizontalSpinnerWeaponModule1.png|center|thumb|600px|Picture of entire weapon module.]] | ||
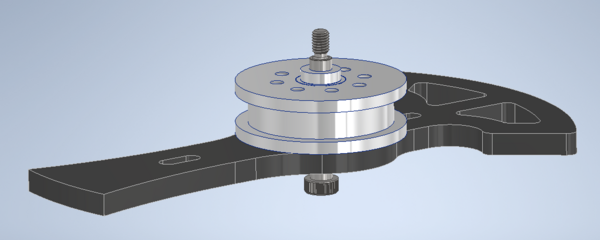
| + | Anarchi's horizontal spinner weapon module frame consisted of 1/4" Aluminum 7075 Plates that were fastened together via 1/2" long 5-40 screws and weighed approximately 4lbs.The compartment for the weapon module was way too narrow resulting in the U-shape that was needed to give clearance to the belt as it spread outwards from the motor. In compartment ended up still being way too narrow as the belt would contact the edges as it spun up, causing some belt grinding and orange dust to form. The other "cat-shaped" hole behind it was a hole for the weapon ESC bullet connectors to come through to connect to the weapon motor bullet connectors. 7075 was chosen because there was stock for it readily available in the shop which is not a good reason. These 1/4" 7075 plates sustained no real damage from combat but it should be known that they never really took any aggressive hits or impacts due to Anarchi never having a super aggressive fight. However, BEAM similar had a solid (no weight saving cutouts) 1/4" 7075 top plate and 1/4" 7075 bottom plate and that was seen to have held up incredibly well through it's extremely aggressive matches. | ||
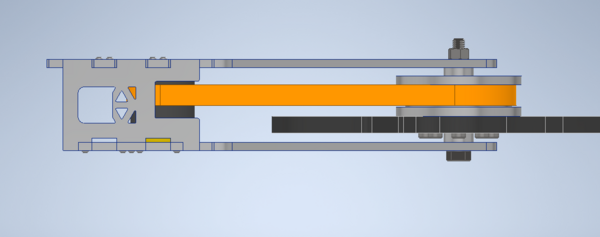
| − | + | [[File:AnarchiHorizontalSpinnerWeaponModule2.png|center|thumb|600px|Sideview of Weapon Module]] | |
| − | |||
| − | |||
| − | + | The module was designed to interface with the chassis and screw in at multiple strengths due to the worry of the weapon module being ripped out. The plates were also held together by the 1/2" diameter shoulder bolt and locknut that held the weapon assembly in place. | |
| − | |||
| − | + | The weapon motor was mounted and bolted down on straight slots that allowed the motor to be pulled back to adjust the belt tension. | |
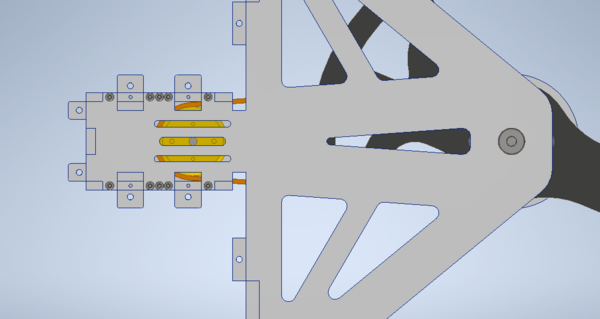
| − | + | [[File:AnarchiHorizontalSpinnerWeaponModule3.png|center|thumb|600px|Bottom View of Weapon Module]] | |
| − | + | A midpoint for the slots was arbitrarily chosen and then a nominal cad representation of the belt from the motor from the midpoint of the slots and the weapon pulley was made. The outer circumference of the CAD-ed belt was then used to determine what outer circumference length belt to order from McMaster with the assumption that the belt could be pulled back enough to reach the right amount of tension. It suffered from alot of issues and points of improvement: | |
| − | == | + | *The slots did not go far enough back as the polyurethane belt permanently stretched over the course of the matches, resulting in us having less than ideal belt tension and a weaker weapon in our third match even when our motor was pulled all the way back. |
| − | [[File: | + | *Better means to calculate the belt length and longer tensioning slots should be pursued. |
| − | *The | + | *Serpentine belts should also be considered over polyurethane belts as they seem to be stronger, of higher quality, and less prone to stretching. |
| − | + | *Another issue with straight slots was that a good hit could potentially loosen the weapon motor mounting bolts and cause the motor to be pulled forward and killing the belt tension so alternate tensioning slot geometries or methods should be considered. | |
| − | *The | + | *With the way our bot was hard to reach into or take apart, we had to pull the motor back by the screws which was difficult and likely caused us to not hit the right amount of tension we should have due to lack of grip strength. The bot should be designed so that the motor can be grabbed by the can and pulled back to tension the weapon belt. |
| − | *The | + | *Serpentine Belts look to be more structurally sound and reliable than polyurethane flat belts are. |
| − | ** | + | === Horizontal Spinner Weapon Bar === |
| + | |||
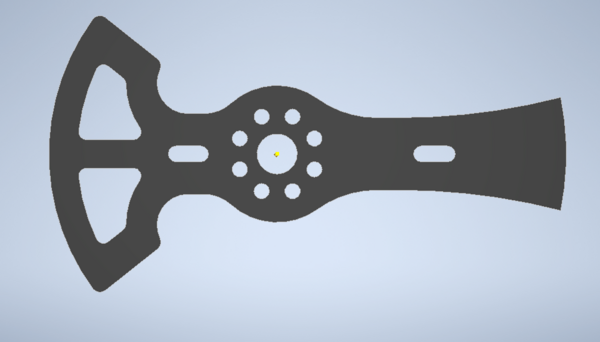
| + | [[File:AnarchiHorizontalSpinnerWeapon1.png|center|thumb|600px|Horziontal SpinnerWeapon in CAD]] | ||
| + | |||
| + | ====Design:==== | ||
| + | |||
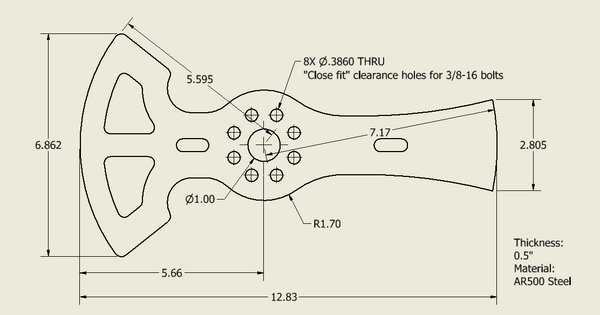
| + | Anarchi's horizontal spinner module utilized an asymmetrical style weapon with a longer impactor end and a wide counterweight to keep the center of mass along the axis of rotation, causing it to resemble a hammer. However, the impactor design was not made with a specific rake angle in mind but it was later measured to be 3.1 degrees. relief angle was also not considered in the design and was 0 degrees which may or may not be ideal. The weapon was made asymmetrical as it would increase the average bite (weapon insertion distance into opponent) by a factor of 2, improving the energy transfer to the opponent upon impact. the weapon It was 0.5" thick and made of AR500 steel which is considered one of the best materials for weapons that can be made via the waterjet. It weighed 4.509lbs and had an MOI (moment of inertia) of 74.825lb*in^2.The impactor ends were designed to sharp as they were intended to bite into opponents' armor better however its effectiveness didn't get the chance to be properly proven. It is constrained via 8 3/8-16 bolts that fasten it securely onto the pulley. The holes are "close fit" clearance holes (you can select a "close" option using hole wizard in Inventor) and in theory would allow a good bit of play if it weren't for the waterjet taper making the holes slightly smaller in reality. If you plan on trying to waterjet AR500 with closer fit clearance holes, it is essential that you do test cuts beforehand because AR500 is extremely difficult to machine. The hole in the middle is an inch long in diameter and was meant to allow a generous amount of clearance between the stationary spacers and the spinning steel weapon. Below is a useful pic of some basic dimensions. | ||
| + | |||
| + | [[File:AnarchiHorizontalSpinnerWeapon2.png|center|thumb|600px|Useful dimensions of weapon. Check CAD file for further details]] | ||
| + | |||
| + | ====Analysis:==== | ||
| + | |||
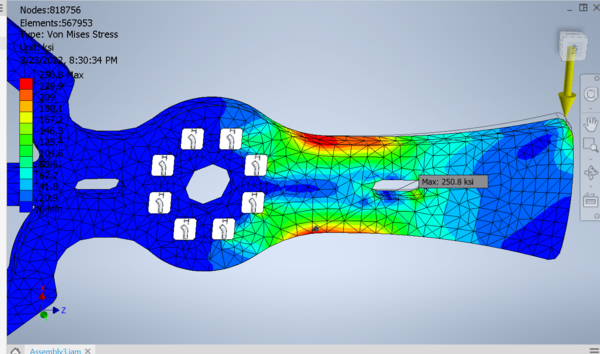
| + | WARNING: The following analysis was not conducted by an FEA expert so please be aware that the approach may be inaccurate and/or incorrect so be very skeptical. | ||
| + | [[File:AnarchiHorizontalSpinnerWeapon3.png|center|thumb|600px|Attempt at FEA Analysis on the weapon. Take this analysis with a bucket of salt]] | ||
| + | |||
| + | Rudimentary FEA was also conducted with an arbitrarily large load applied to a corner edge of the impactor and the weapon being constrained via 8 dowel pin parts where the contacts/constraints for the weapon were applied to simulate the bolts. It was found that the greatest stress occurred along the curvature between the central outer diameter and the length of the impactor similar to a cantilever beam with a constant end load. It was found that the greater the value of the curvature radius, the lower the max stress. An interesting thing to note is that the reaction forces on the contacts were calculated to be the greatest on the two rightmost bolts, 2nd greatest on the two bolts immediately to the left of them, and lowest on the bolts to the left of the center. This lead to the assumption that it was imperative to make the bolts be as large as reasonable to minimize the shear stress on the individual bolts to minimize the chances of the first two bolts on the right of the center failing. 3/8-16 bolts were selected due to the fact that they were the largest reasonable sized hole we could fit within the given geometry and that we already had taps for them in the shop. | ||
| + | |||
| + | A key element of designing an asymmetrical weapon is making sure the non impactor side won't be making contact with the opponent before the impactor does. The theory of bite is discussed in detail starting on page. 158 of the Riobotz Combot Tutorial. Our calculations, as linked below, assumed that the robot driving velocity would be 16.7mph and that the max rpm would be around 6528rpm. These values were produced by the Team Just'Cuz Robotics drivetrain calculator and the runAmok Spin-up calculator and as a result, both are not very accurate to real life (both better theoretical and validated models need to be developed). Based on the bite equation presented on page 158, our dmax was calculated to be 2.574803 inches with the average bite being 1.2874015 inches. Where our calculations differ from the Riobotz Combot Tutorial is that we check to make sure that the minimum distance at the point in the rotation where the weapon counterweight starts to pull away from the opponent is greater than zero to ensure that contact won't be made as this is the closest they will be to each other. We just made sure that this distance was greater than 0 since we knew the drive was going to be slower but it would be recommended to use some sort of safety factor for this in the future. | ||
| + | ====Manufacturing:==== | ||
| + | |||
| + | The weapon was waterjetted out of an approximately 0.5" thick AR500 steel shooting target from makeittargets.com. Make it ring targets don't have a super tight tolerance on their plate thicknesses as ours measured around 0.491" thick. The settings used on the waterjet cut are listed below and yielded very satisfactory results given the weapon didn't need to hit any tight tolerances unlike the press fit D-shape that Binari's weapon needed. In addition, most of the contours were cut on quality 3 while the clearance holes were cut at quality 5 since they would have to interface closely with the bolts. It's recommended to cut the "teeth" contours at a higher quality. The cut took approximately 58 minutes but we had no issues with it. The overall geometry came out nicely and the weapon was well balanced with no perceptible vibrations in the bot upon spinning up. The weapon was sandblasted to get rid of rust and mill scale which resulted in a clean, matte finnish. | ||
| + | |||
| + | |||
| + | Waterjet OMAX Make Cut Settings: | ||
| + | |||
| + | Material: Tool Steel D2 (RC 60) | ||
| + | |||
| + | Machinability: 54.08 (Metal) | ||
| + | |||
| + | Thickness: 0.55in | ||
| + | |||
| + | Tool Offset: 0.0125 inches | ||
| + | |||
| + | ====Performance:==== | ||
| + | *Weapon was very well balanced when spinning up. | ||
| + | *Due to drive not working well, anarchi's weapon was never able to achieve it's maximum possible bite, and therefore a really good hit, in its matches | ||
| + | *Waterjet taper made the holes slightly smaller than in CAD, resulting in little play, keeping the weapon pretty axially-symmetric with the pulley | ||
| + | *Sharp edges of impactor teeth started blunting slightly after the first two matches although this did not seem to off-balance the weapon any noticeable amount. | ||
| + | *Overall geometry of the weapon held up very well and no perceptible deformation was observed in the overall shape. | ||
| + | *Due to the ratio of bot wideness to weapon length, the area of protection/attack given by the weapon in the front of the bot was smaller than counterparts such as BEAM. Consider increasing weapon diameter or reducing bot width. | ||
| + | *The 8 3/8-16 bolts could possibly be overkill as some other horizontal spinners like BEAM used 6 1/4-20 bolts in their bolt circle. | ||
| + | *Design wasn't made with a specific rake angle or relief angle in mind. The greater the rake angle, the better the weapon will be at biting into the opponent and transferring energy at the cost of blunting faster. If the rake angle is too large, it can make the teeth more fragile. | ||
| + | *A member from Hypershock recommends that the impactor side of weapons like that be flat on the end in order to prevent the insertion edge from prying itself out of an enemy bot's armor. | ||
| + | *Advantage of having weapon weapon being symmetric around the line between the impactor and counterweight is that you have two impactor teeth instead of just one meaning you can flip it around in case one of the teeth gets too blunted which would be a bigger problem given a larger rake angle. Issue is that you can't implement a large relief angle if you do that so it's a tradeoff. Relief angles also make the teeth weaker. | ||
| + | *Weapon was relatively light (under 20% of total weight) due to modular interface taking up weight. Will have hit harder if bigger. Many bots do between 20-33% of total weight. | ||
| + | |||
| + | === Horizontal Spinner Weapon Assembly === | ||
| + | |||
| + | [[File:AnarchiHorizontalSpinnerWeaponAssembly1.png|center|thumb|600px|Bottom View of Weapon Module]] | ||
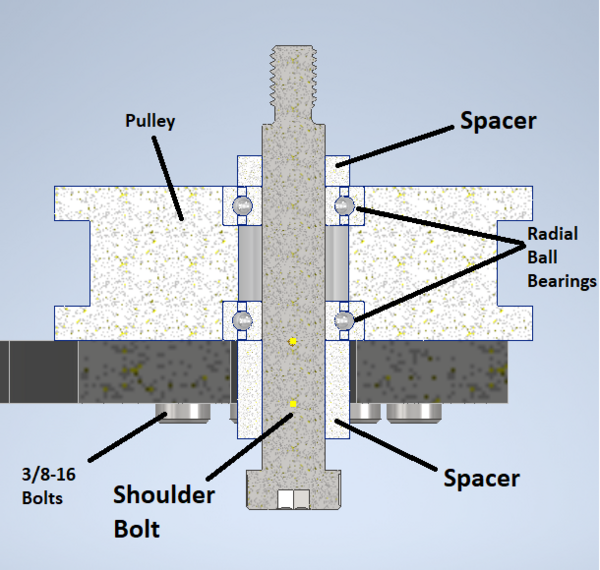
| + | Anarchi's weapon assembly was build around a 1/2" diameter alloy steel shoulder bolt which served as a deadshaft. It was lightly press-fit into the the frame and was constrained axially via a locknut and washer. The pulley was made of Aluminum 6061 and had two steel radial ball bearings press-fitted into both ends, allowing smooth rotation between the weapon assembly and the dead shaft shoulder bolt. The choice of only radial bearings did not account for axial forces which was a failure of this design. The pulley was made of 6061 since there was some leftover 6061 rod stock but different materials may be better. The weapon bar was attached onto the pulley via 8 3/8-16 low profile alloy steel socket head bolts with the threads going all the way through the aluminum pulley. The weapon assembly was constrained axially by two custom Aluminum 7075 spacers which sat on top of the stationary inner race of the bearing and were barely smaller in diameter than the inner diameter of the outer race. 7075 was chosen for the spacers as we knew they would be rendered ineffective once they deformed so we took the gamble with the higher yield strength of 7075. | ||
| + | |||
| + | [[File:AnarchiHorizontalSpinnerWeaponAssembly2.png|center|thumb|600px|Bottom View of Weapon Module]] | ||
| + | |||
| + | The weapon assembly was driven by a 1/8" thick, 5/8" wide polyurethane flat belt with a pulley ratio of 1.68 between the pulley and the motor can diameter. The motor was a Scorpion SII-4025-520KV and was selected for having a KV value similar to other horizontals as well as being relatively cheap. It appeared to perform well but we're not sure if this was the absolute best motor we could've selected so do your own research. The theoretical maximum rpm (based on only V and Kv and the pulley ratio) was around 6871.579rpm and the theoretical maximum kinetic energy was 5782.375J but in reality it would've been a fair bit lower due to friction effects which would cause the motor's no-load current to be non-negligible. Measurements and approximations for this no-load current may be available in the future. The spin-up times calculated were of dubious accuracy due to a lack of a good calculation for the stall current due to the internal resistances of the LiPo batteries and other circuit elements being unknown. In reality, the weapon did spin-up to a decent speed in a decent amount of time but we can't help but feel like it wasn't optimized. In addition, it was possible that the batteries did not have a high enough discharge rate to supply the maximum amount of current the motor could've taken, leading to a slower spin up time. The belt not being optimally tensioned also likely lead to the motor not spinning up as fast as it could've as up to a certain point, more tension leads to the belt being able to grip and pull on the pulley better rather than slip. | ||
| + | |||
| + | Other Thoughts | ||
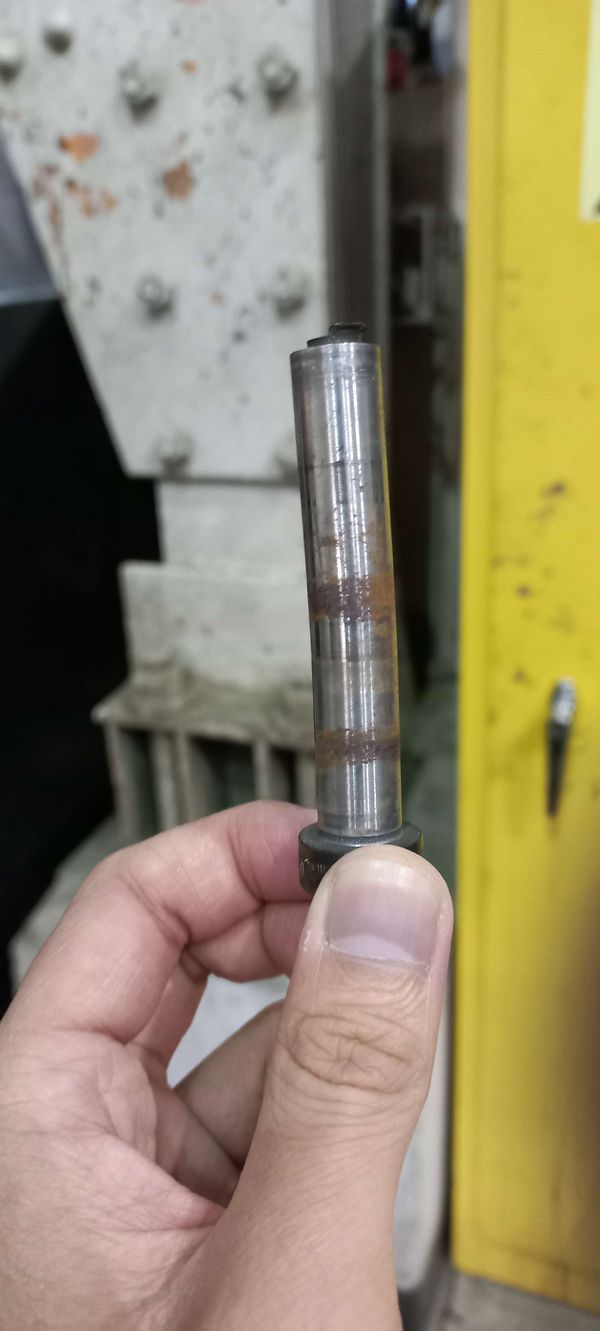
| + | *1/2" Diameter Shoulder bolt got bent. Future bots using shoulder bolts should be specced to be significantly stronger than this 1/2" diameter shoulder bolt to account for more aggressive damage | ||
| + | [[File:AnarchiBentShaft.jpg|center|thumb|600px|Bent shaft, rust is where the bearings were]] | ||
| + | *You should make sure your bearings are capable of taking axial loads from vertical spinners. Some options include a combination of radial and thrust bearings or tapered roller bearings. | ||
| + | *You should make sure that your bearings can be removed via some reasonable method from their press-fit bores to be replaced if they wear down or shatter. | ||
| + | *Not sure if we should've made the pulley out of 7075. 7075 is stronger and will take a greater static load to yield than 6061 but once it fails, it will completely fracture as it has a lower fracture toughness and is more brittle than 6061. Meanwhile 6061 would get bent or dented. For some pulley designs, deformation would effectively make it useless and therefore it would be better to use 7075 in those cases and possibly make a spare. | ||
== Electronics == | == Electronics == | ||
| Line 53: | Line 176: | ||
|- | |- | ||
| Drive Motors | | Drive Motors | ||
| − | | <span style="color: rgb(0, 0, 0); font-family: arial, sans, sans-serif; line-height: normal; white-space: pre-wrap;"> | + | | <span style="color: rgb(0, 0, 0); font-family: arial, sans, sans-serif; line-height: normal; white-space: pre-wrap;"> Vex 775 pro (brushed 12V motors) |
</span><br/> | </span><br/> | ||
|- | |- | ||
| Line 79: | Line 202: | ||
== Competitions == | == Competitions == | ||
| − | === [[ | + | === [[AVC 2022|AVC 2022]] === |
*Results: 1-2 | *Results: 1-2 | ||
**Bracket Style: Double Elimination | **Bracket Style: Double Elimination | ||
| − | ***[Anarchi (loser) V.S. Wedgeham (loser): | + | ***[Anarchi (loser) V.S. Wedgeham (loser): https://photos.app.goo.gl/D8mtPiKYhxo55Fw7A] |
**** Match started with Wedgeham overwhelming Anarchi with it's superior driving by raming into us and pushing us into the wall repeatedly | **** Match started with Wedgeham overwhelming Anarchi with it's superior driving by raming into us and pushing us into the wall repeatedly | ||
**** Anarchi never tried to spin it's weapon up to maximum velocity due to the fear of self damage. | **** Anarchi never tried to spin it's weapon up to maximum velocity due to the fear of self damage. | ||
| Line 91: | Line 214: | ||
**** After the match, it was determined that the left drive motor would no longer spin the drive wheel when above 60% throttle | **** After the match, it was determined that the left drive motor would no longer spin the drive wheel when above 60% throttle | ||
**** We were unable to repair the gearboxes as the bot would have to be mostly disassembled in order to access them. The issue likely could've been solved if we had been able to easily open up the gearboxes | **** We were unable to repair the gearboxes as the bot would have to be mostly disassembled in order to access them. The issue likely could've been solved if we had been able to easily open up the gearboxes | ||
| − | ***[Anarchi (winner) V.S. Dragon Fruit (loser): | + | ***[Anarchi (winner) V.S. Dragon Fruit (loser): https://photos.app.goo.gl/7uSu6ztewT8dYRVG8] |
**** Drive was much slower and harder to control. Had to slowly move anarchi towards the opponent | **** Drive was much slower and harder to control. Had to slowly move anarchi towards the opponent | ||
**** DragonFruit had a spinning active weapon and drive but seemed to also have some slight driving issues | **** DragonFruit had a spinning active weapon and drive but seemed to also have some slight driving issues | ||
| Line 97: | Line 220: | ||
**** After this match, orange powder from the polyurethane flat belts grinding against the inner side plate had formed and the bearings didn't spin as cleanly as previously (they felt slightly crunchier) | **** After this match, orange powder from the polyurethane flat belts grinding against the inner side plate had formed and the bearings didn't spin as cleanly as previously (they felt slightly crunchier) | ||
**** Weapon had suffered a small amount of blunting around the edges that made impact. | **** Weapon had suffered a small amount of blunting around the edges that made impact. | ||
| − | ***[Anarchi (loser) V.S. Crippling Depression (winner): | + | ***[Anarchi (loser) V.S. Crippling Depression (winner): https://youtu.be/ooXjWFQvh24?t=343] |
**** Drive had almost completely failed. Anarchi was unable to fully drive to the starting zone | **** Drive had almost completely failed. Anarchi was unable to fully drive to the starting zone | ||
**** Crippling depression fought in overcutter mode to likely avoid unnessecary damage to itself as Robert Cowan knew our drive was no longer working and he had matches left | **** Crippling depression fought in overcutter mode to likely avoid unnessecary damage to itself as Robert Cowan knew our drive was no longer working and he had matches left | ||
| Line 103: | Line 226: | ||
**** More orange powder had formed and the weapon bearings now felt significantly more crunchy and spun less smoothly. In a perfect world, they should've been replaced before this match. | **** More orange powder had formed and the weapon bearings now felt significantly more crunchy and spun less smoothly. In a perfect world, they should've been replaced before this match. | ||
| − | ==== | + | ==== Parting Thoughts ==== |
| − | + | *Designing for replaceability and reparability is really important. Moving components such of bearings should be accessible via removing two plates or less and replacements should be bought | |
| − | * | + | *A simple robust system is better than a more complicated system |
| − | * | + | *Identify parts where the tolerances really matter and don't be afraid to spend more time on them |
| − | + | *Do test puzzlefits on the waterjet to find clearance values that work before waterjetting the entire part. Repeat this for each plate thickness and plate material. | |
| − | + | *Start machining early. It'll be difficult to get all your parts done while competing with other teams for CMA machine time. | |
| − | + | *Don't be afraid to spend more money on higher quality parts | |
| − | * | + | *Pay attention to where you buy your parts. Banebots gearboxes tend to be more robustly constructed than Vex Gearboxes for example. |
| − | * | + | *Try to do your own calculations first before relying on online calculators as you don't know what assumptions they make. |
| + | *Look into battle-hardening your motors. | ||
| + | *Sand-blast your steel weapon with the sandblaster in the CMA. It'll make it look real nice. | ||
== Trivia == | == Trivia == | ||
| − | * | + | *You can make a filet with a dremel if you're good enough |
| + | *We're on the thumbnail in one of Robert Cowan's videos | ||
[[Category: BattleBots]] | [[Category: BattleBots]] | ||
[[Category: FeatherWeights]] | [[Category: FeatherWeights]] | ||
[[Category: BigBots]] | [[Category: BigBots]] | ||
Latest revision as of 23:51, 27 September 2022
Contents
Introduction
Anarchi was supposed to be an experimental 30lb bot where it's primary weapon could be switched between a horizontal spinner and a drum spinner via weapon modules that would be held by the chassis using a modular interface. Unfortunately, due to the poor member retention throughout the semester, the team was unable to manufacture the drum spinner module and was only able to finish the horizontal spinner module before competing in AVC 2022.
Members:
- Dylan Adriano (Bot Lead)
- Brian Naing
- Cade Tyler
- Jackson Isenberg
- Lucas Luwa
Chassis
Main Chassis
The main chassis is a basic rectangular frame of 3/8" Aluminum 6061. Bolts put the entire frame together in various directions to avoid shear upon collision. Each side of the robot was covered with plates for protection. The chassis was designed with strength and stability being the biggest priority, since we felt that the weapon would be a weak point due to the necessary modularity.
The biggest problem the chassis has is that, in order to try and make it as sturdy as possible, the number of box joints used was absurdly overkill. This led to it being incredibly difficult to remove a plate for an access point to the electronics and motor gearboxes.
The positive side is that the chassis structure was almost completely unscathed after competition, but it made it impossible to fix issues with the drive motor gearbox that cost us greatly in matches. Team should consider reaching an equilibrium between stability and replaceability. The chassis’s structure and concept was designed before the final version of the drivebase. When the drivebase was finished, the chassis was iteratively updated to fit the drive system. However, electronics space was never considered until it was too late. It was always on the back of our minds but was never implemented until it was too late. This led to some bad wire congestion in our chassis that could have been mitigated by proper design and planning.
Each plate was pocketed in a certain way to represent anarchy as a namesake feature.
Modular Interface
The modular interface is the crux of the modular robot design. The interface was designed for the ability to slide the weapon module into the center of the robot and then attach it using bolts into threaded holes. Through this universal interfacing design, any weapon module following this interface could slide into the chassis. A benefit of this design is that is relatively simple and only requires that very simple attachment mechanism to fit any weapon module so long as it follows the universal interface design. This was (supposed to be) Anarchi's major selling point -- that the robot could work with any weapon design.
The main problem with the interface is the fact that it requires very precise manufacturing to maintain assembly strength and allow for the weapon module to be inserted and removed easily. This became a very difficult engineering challenge, especially since we did not properly consider tolerances when designing the chassis. As a result, we had to file down the puzzle fits and interface sides in order to even fit the pieces together.
Another problem was that the interface did not consider factors such as center of mass or weapon height, which was especially troublesome when we wanted to try designing a vertical spinner. The interface was not well equipped to handle major changes in the center of mass of the robot and therefore limited what kinds of weapon were viable for the interface.
Drive System
Overview
| Wheels | Colson Performa wheels https://www.vexrobotics.com/775pro.html |
| Gearbox | VersaPlanetary 10:1 gearboxes https://www.vexrobotics.com/versaplanetary.html |
The drive system consisted of four wheels, two on each side. The back wheels were directly driven and the front wheels were connected to the back wheels with timing belts and pulleys. The drive motor shafts, wheel hubs, and driveshafts were all hexagonal. The back wheels were mounted directly on the drive motor shaft. To constrain the wheels axially, the CAD of a timing pulley was “borrowed” from McMaster and edited such that a shoulder pressed against a bearing in the outer side plate. That bearing was pressed into a pocket so it could not slide.
The front wheels were assembled in the following way:
Inner bearing cover – Flanged bearing – Retaining ring – Wheel – Timing pulley – Retaining ring – Flanged bearing
The inner bearing covers were 3D printed parts protecting electronics from spinning things. The flanged bearings were pressed into the inner and outer side plates. The rest of the items were put on the drive shaft and sandwiched between the bearings to constrain everything axially. For both the front and back timing pulleys, 6-32 bolts were used to hold the timing pulleys to the wheels. Both the front and back timing pulleys were printed out of ABS. PLA copies as backup were also printed last minute. The timing pulleys did not break during any of the fights (aside from a small extrusion which did not affect how they functioned).
Issues
A lot :(
Below are issues roughly ranked from most severe (#1) to least severe (#7)
1. Motor shaft slipping within gearbox interface. There were a few causes. First, Vex gearboxes are not designed for combat robotics and appear to be designed to slip at a certain torque to prevent damage. Second, a key didn’t fit in the gearbox during assembly. Due to a lack of time, the short term solution was to ignore it and if it was a problem later to fix it (spoiler: It was a problem later).
2. The modular bot was in fact not very modular. After the severe lack of drive was noticed after the 2nd fight at AVC the plan was to finally address the issue. However, access to the gearbox required nearly the entire boat to be disassembled and there was not time. Make important subassemblies fast to remove to fix or replace.
3. Retaining ring grooves in hexagonal shafts should be avoided for a number of reasons. Retaining rings are designed for specific grooves with tolerances (check manufacturer’s catalog) that are tricky to achieve in a non circular shaft. So machining them can be difficult and result in inaccurate grooves. The rings also plastically deform if they are stretched just a little past the shaft they are designed for. During competition only a single retaining ring ended up going on each shaft.
4. Brushless motors appear to be much more common in BattleBots (for both drive and weapon). Do your research.
5. The back and front wheels are connected by a timing belt. Initial calculations were off and the belt ended up being too loose. Here were different efforts taken to solve the issue: A. Printing the next larger timing pulley on McMaster (slightly too large) B. Creating and printing a custom timing pulley with one more tooth than the configuration that was too loose. This was barely too tight and the drive couldn’t be assembled. C. Solution that ended up being used: creating two idlers with bushings for each side. They were able to be mounted in the outer side plate without any changes Better solutions: A. Do better math in the start B. Have some way to tension the belt in case the math is off or the belt lengthens over time C. Do things less last minute and have time to purchase another belt D. Avoid belts and use chains or gears. Although each method of power transmission potentially has issues
6. The center of mass was slightly in front of the front wheels instead of in between the front/back wheels. This turned out to not really be an issue. At least as far as we could tell for the short amount of time it could drive.
7. The Drive ESC was way over-specced. Both current wise and had random features like regenerative braking. Although it did work fine, purchasing a more suitable ESC is probably better.
TL;DR
Drive is important - do your research and figure out what works
Weapon Systems
Horizontal Spinner Module
Anarchi's horizontal spinner weapon module frame consisted of 1/4" Aluminum 7075 Plates that were fastened together via 1/2" long 5-40 screws and weighed approximately 4lbs.The compartment for the weapon module was way too narrow resulting in the U-shape that was needed to give clearance to the belt as it spread outwards from the motor. In compartment ended up still being way too narrow as the belt would contact the edges as it spun up, causing some belt grinding and orange dust to form. The other "cat-shaped" hole behind it was a hole for the weapon ESC bullet connectors to come through to connect to the weapon motor bullet connectors. 7075 was chosen because there was stock for it readily available in the shop which is not a good reason. These 1/4" 7075 plates sustained no real damage from combat but it should be known that they never really took any aggressive hits or impacts due to Anarchi never having a super aggressive fight. However, BEAM similar had a solid (no weight saving cutouts) 1/4" 7075 top plate and 1/4" 7075 bottom plate and that was seen to have held up incredibly well through it's extremely aggressive matches.
The module was designed to interface with the chassis and screw in at multiple strengths due to the worry of the weapon module being ripped out. The plates were also held together by the 1/2" diameter shoulder bolt and locknut that held the weapon assembly in place.
The weapon motor was mounted and bolted down on straight slots that allowed the motor to be pulled back to adjust the belt tension.
A midpoint for the slots was arbitrarily chosen and then a nominal cad representation of the belt from the motor from the midpoint of the slots and the weapon pulley was made. The outer circumference of the CAD-ed belt was then used to determine what outer circumference length belt to order from McMaster with the assumption that the belt could be pulled back enough to reach the right amount of tension. It suffered from alot of issues and points of improvement:
- The slots did not go far enough back as the polyurethane belt permanently stretched over the course of the matches, resulting in us having less than ideal belt tension and a weaker weapon in our third match even when our motor was pulled all the way back.
- Better means to calculate the belt length and longer tensioning slots should be pursued.
- Serpentine belts should also be considered over polyurethane belts as they seem to be stronger, of higher quality, and less prone to stretching.
- Another issue with straight slots was that a good hit could potentially loosen the weapon motor mounting bolts and cause the motor to be pulled forward and killing the belt tension so alternate tensioning slot geometries or methods should be considered.
- With the way our bot was hard to reach into or take apart, we had to pull the motor back by the screws which was difficult and likely caused us to not hit the right amount of tension we should have due to lack of grip strength. The bot should be designed so that the motor can be grabbed by the can and pulled back to tension the weapon belt.
- Serpentine Belts look to be more structurally sound and reliable than polyurethane flat belts are.
Horizontal Spinner Weapon Bar
Design:
Anarchi's horizontal spinner module utilized an asymmetrical style weapon with a longer impactor end and a wide counterweight to keep the center of mass along the axis of rotation, causing it to resemble a hammer. However, the impactor design was not made with a specific rake angle in mind but it was later measured to be 3.1 degrees. relief angle was also not considered in the design and was 0 degrees which may or may not be ideal. The weapon was made asymmetrical as it would increase the average bite (weapon insertion distance into opponent) by a factor of 2, improving the energy transfer to the opponent upon impact. the weapon It was 0.5" thick and made of AR500 steel which is considered one of the best materials for weapons that can be made via the waterjet. It weighed 4.509lbs and had an MOI (moment of inertia) of 74.825lb*in^2.The impactor ends were designed to sharp as they were intended to bite into opponents' armor better however its effectiveness didn't get the chance to be properly proven. It is constrained via 8 3/8-16 bolts that fasten it securely onto the pulley. The holes are "close fit" clearance holes (you can select a "close" option using hole wizard in Inventor) and in theory would allow a good bit of play if it weren't for the waterjet taper making the holes slightly smaller in reality. If you plan on trying to waterjet AR500 with closer fit clearance holes, it is essential that you do test cuts beforehand because AR500 is extremely difficult to machine. The hole in the middle is an inch long in diameter and was meant to allow a generous amount of clearance between the stationary spacers and the spinning steel weapon. Below is a useful pic of some basic dimensions.
Analysis:
WARNING: The following analysis was not conducted by an FEA expert so please be aware that the approach may be inaccurate and/or incorrect so be very skeptical.
Rudimentary FEA was also conducted with an arbitrarily large load applied to a corner edge of the impactor and the weapon being constrained via 8 dowel pin parts where the contacts/constraints for the weapon were applied to simulate the bolts. It was found that the greatest stress occurred along the curvature between the central outer diameter and the length of the impactor similar to a cantilever beam with a constant end load. It was found that the greater the value of the curvature radius, the lower the max stress. An interesting thing to note is that the reaction forces on the contacts were calculated to be the greatest on the two rightmost bolts, 2nd greatest on the two bolts immediately to the left of them, and lowest on the bolts to the left of the center. This lead to the assumption that it was imperative to make the bolts be as large as reasonable to minimize the shear stress on the individual bolts to minimize the chances of the first two bolts on the right of the center failing. 3/8-16 bolts were selected due to the fact that they were the largest reasonable sized hole we could fit within the given geometry and that we already had taps for them in the shop.
A key element of designing an asymmetrical weapon is making sure the non impactor side won't be making contact with the opponent before the impactor does. The theory of bite is discussed in detail starting on page. 158 of the Riobotz Combot Tutorial. Our calculations, as linked below, assumed that the robot driving velocity would be 16.7mph and that the max rpm would be around 6528rpm. These values were produced by the Team Just'Cuz Robotics drivetrain calculator and the runAmok Spin-up calculator and as a result, both are not very accurate to real life (both better theoretical and validated models need to be developed). Based on the bite equation presented on page 158, our dmax was calculated to be 2.574803 inches with the average bite being 1.2874015 inches. Where our calculations differ from the Riobotz Combot Tutorial is that we check to make sure that the minimum distance at the point in the rotation where the weapon counterweight starts to pull away from the opponent is greater than zero to ensure that contact won't be made as this is the closest they will be to each other. We just made sure that this distance was greater than 0 since we knew the drive was going to be slower but it would be recommended to use some sort of safety factor for this in the future.
Manufacturing:
The weapon was waterjetted out of an approximately 0.5" thick AR500 steel shooting target from makeittargets.com. Make it ring targets don't have a super tight tolerance on their plate thicknesses as ours measured around 0.491" thick. The settings used on the waterjet cut are listed below and yielded very satisfactory results given the weapon didn't need to hit any tight tolerances unlike the press fit D-shape that Binari's weapon needed. In addition, most of the contours were cut on quality 3 while the clearance holes were cut at quality 5 since they would have to interface closely with the bolts. It's recommended to cut the "teeth" contours at a higher quality. The cut took approximately 58 minutes but we had no issues with it. The overall geometry came out nicely and the weapon was well balanced with no perceptible vibrations in the bot upon spinning up. The weapon was sandblasted to get rid of rust and mill scale which resulted in a clean, matte finnish.
Waterjet OMAX Make Cut Settings:
Material: Tool Steel D2 (RC 60)
Machinability: 54.08 (Metal)
Thickness: 0.55in
Tool Offset: 0.0125 inches
Performance:
- Weapon was very well balanced when spinning up.
- Due to drive not working well, anarchi's weapon was never able to achieve it's maximum possible bite, and therefore a really good hit, in its matches
- Waterjet taper made the holes slightly smaller than in CAD, resulting in little play, keeping the weapon pretty axially-symmetric with the pulley
- Sharp edges of impactor teeth started blunting slightly after the first two matches although this did not seem to off-balance the weapon any noticeable amount.
- Overall geometry of the weapon held up very well and no perceptible deformation was observed in the overall shape.
- Due to the ratio of bot wideness to weapon length, the area of protection/attack given by the weapon in the front of the bot was smaller than counterparts such as BEAM. Consider increasing weapon diameter or reducing bot width.
- The 8 3/8-16 bolts could possibly be overkill as some other horizontal spinners like BEAM used 6 1/4-20 bolts in their bolt circle.
- Design wasn't made with a specific rake angle or relief angle in mind. The greater the rake angle, the better the weapon will be at biting into the opponent and transferring energy at the cost of blunting faster. If the rake angle is too large, it can make the teeth more fragile.
- A member from Hypershock recommends that the impactor side of weapons like that be flat on the end in order to prevent the insertion edge from prying itself out of an enemy bot's armor.
- Advantage of having weapon weapon being symmetric around the line between the impactor and counterweight is that you have two impactor teeth instead of just one meaning you can flip it around in case one of the teeth gets too blunted which would be a bigger problem given a larger rake angle. Issue is that you can't implement a large relief angle if you do that so it's a tradeoff. Relief angles also make the teeth weaker.
- Weapon was relatively light (under 20% of total weight) due to modular interface taking up weight. Will have hit harder if bigger. Many bots do between 20-33% of total weight.
Horizontal Spinner Weapon Assembly
Anarchi's weapon assembly was build around a 1/2" diameter alloy steel shoulder bolt which served as a deadshaft. It was lightly press-fit into the the frame and was constrained axially via a locknut and washer. The pulley was made of Aluminum 6061 and had two steel radial ball bearings press-fitted into both ends, allowing smooth rotation between the weapon assembly and the dead shaft shoulder bolt. The choice of only radial bearings did not account for axial forces which was a failure of this design. The pulley was made of 6061 since there was some leftover 6061 rod stock but different materials may be better. The weapon bar was attached onto the pulley via 8 3/8-16 low profile alloy steel socket head bolts with the threads going all the way through the aluminum pulley. The weapon assembly was constrained axially by two custom Aluminum 7075 spacers which sat on top of the stationary inner race of the bearing and were barely smaller in diameter than the inner diameter of the outer race. 7075 was chosen for the spacers as we knew they would be rendered ineffective once they deformed so we took the gamble with the higher yield strength of 7075.
The weapon assembly was driven by a 1/8" thick, 5/8" wide polyurethane flat belt with a pulley ratio of 1.68 between the pulley and the motor can diameter. The motor was a Scorpion SII-4025-520KV and was selected for having a KV value similar to other horizontals as well as being relatively cheap. It appeared to perform well but we're not sure if this was the absolute best motor we could've selected so do your own research. The theoretical maximum rpm (based on only V and Kv and the pulley ratio) was around 6871.579rpm and the theoretical maximum kinetic energy was 5782.375J but in reality it would've been a fair bit lower due to friction effects which would cause the motor's no-load current to be non-negligible. Measurements and approximations for this no-load current may be available in the future. The spin-up times calculated were of dubious accuracy due to a lack of a good calculation for the stall current due to the internal resistances of the LiPo batteries and other circuit elements being unknown. In reality, the weapon did spin-up to a decent speed in a decent amount of time but we can't help but feel like it wasn't optimized. In addition, it was possible that the batteries did not have a high enough discharge rate to supply the maximum amount of current the motor could've taken, leading to a slower spin up time. The belt not being optimally tensioned also likely lead to the motor not spinning up as fast as it could've as up to a certain point, more tension leads to the belt being able to grip and pull on the pulley better rather than slip.
Other Thoughts
- 1/2" Diameter Shoulder bolt got bent. Future bots using shoulder bolts should be specced to be significantly stronger than this 1/2" diameter shoulder bolt to account for more aggressive damage
- You should make sure your bearings are capable of taking axial loads from vertical spinners. Some options include a combination of radial and thrust bearings or tapered roller bearings.
- You should make sure that your bearings can be removed via some reasonable method from their press-fit bores to be replaced if they wear down or shatter.
- Not sure if we should've made the pulley out of 7075. 7075 is stronger and will take a greater static load to yield than 6061 but once it fails, it will completely fracture as it has a lower fracture toughness and is more brittle than 6061. Meanwhile 6061 would get bent or dented. For some pulley designs, deformation would effectively make it useless and therefore it would be better to use 7075 in those cases and possibly make a spare.
Electronics
| Drive Motors | Vex 775 pro (brushed 12V motors)
|
| Drive Motor Controllers | Sabertooth Dual 25A 6V-24V Regenerative Motor Driver |
| Weapon Motor | Horizontal: Scorpion SII-4035-250KV, Drum: HKIV-4025-1100KV |
| Weapon Motor Controllers | HobbyWing Platinum PRO V4 120A ESC |
| Receiver | Hobby King 2.4Ghz Receiver 6Ch V2 |
| Remote Control | Hobby King 2.4Ghz 6Ch Tx and Rx V2 |
| Battery | Zeee 22.2V 60C 4000mAh 6S Lipo Battery |
Competitions
AVC 2022
- Results: 1-2
- Bracket Style: Double Elimination
- [Anarchi (loser) V.S. Wedgeham (loser): https://photos.app.goo.gl/D8mtPiKYhxo55Fw7A]
- Match started with Wedgeham overwhelming Anarchi with it's superior driving by raming into us and pushing us into the wall repeatedly
- Anarchi never tried to spin it's weapon up to maximum velocity due to the fear of self damage.
- Anarchi landed a few small hits on wedgeham but none enough to do any significant damage due to the weapon not being able to reach it's max velocity
- Half-way through the match, the gear boxes got internally damaged, slowing down our drive and our ability to move
- When time hit 3 minutes, Wedgeham was the decided winner due to it being able to prevent us from spinning up or moving properly
- After the match, it was determined that the left drive motor would no longer spin the drive wheel when above 60% throttle
- We were unable to repair the gearboxes as the bot would have to be mostly disassembled in order to access them. The issue likely could've been solved if we had been able to easily open up the gearboxes
- [Anarchi (winner) V.S. Dragon Fruit (loser): https://photos.app.goo.gl/7uSu6ztewT8dYRVG8]
- Drive was much slower and harder to control. Had to slowly move anarchi towards the opponent
- DragonFruit had a spinning active weapon and drive but seemed to also have some slight driving issues
- Weapon was able to spin up to a high enough speed to rip off DragonFruit's wheel resulting in them tapping out.
- After this match, orange powder from the polyurethane flat belts grinding against the inner side plate had formed and the bearings didn't spin as cleanly as previously (they felt slightly crunchier)
- Weapon had suffered a small amount of blunting around the edges that made impact.
- [Anarchi (loser) V.S. Crippling Depression (winner): https://youtu.be/ooXjWFQvh24?t=343]
- Drive had almost completely failed. Anarchi was unable to fully drive to the starting zone
- Crippling depression fought in overcutter mode to likely avoid unnessecary damage to itself as Robert Cowan knew our drive was no longer working and he had matches left
- Weapon was unable to spin up to a sufficient speed due to Crippling Depression's constant ramming. Crippling depression kept ramming us until our drive would not work at all.
- More orange powder had formed and the weapon bearings now felt significantly more crunchy and spun less smoothly. In a perfect world, they should've been replaced before this match.
- [Anarchi (loser) V.S. Wedgeham (loser): https://photos.app.goo.gl/D8mtPiKYhxo55Fw7A]
- Bracket Style: Double Elimination
Parting Thoughts
- Designing for replaceability and reparability is really important. Moving components such of bearings should be accessible via removing two plates or less and replacements should be bought
- A simple robust system is better than a more complicated system
- Identify parts where the tolerances really matter and don't be afraid to spend more time on them
- Do test puzzlefits on the waterjet to find clearance values that work before waterjetting the entire part. Repeat this for each plate thickness and plate material.
- Start machining early. It'll be difficult to get all your parts done while competing with other teams for CMA machine time.
- Don't be afraid to spend more money on higher quality parts
- Pay attention to where you buy your parts. Banebots gearboxes tend to be more robustly constructed than Vex Gearboxes for example.
- Try to do your own calculations first before relying on online calculators as you don't know what assumptions they make.
- Look into battle-hardening your motors.
- Sand-blast your steel weapon with the sandblaster in the CMA. It'll make it look real nice.
Trivia
- You can make a filet with a dremel if you're good enough
- We're on the thumbnail in one of Robert Cowan's videos
