Difference between revisions of "Robot Basics"
Rbalamurali3 (talk | contribs) |
|||
| (20 intermediate revisions by one other user not shown) | |||
| Line 1: | Line 1: | ||
| + | [[Category: BattleBots]] | ||
== '''Overview''' == | == '''Overview''' == | ||
Welcome to Battlebots! The environment of Battlebots will be fairly fast-paced. We only meet once a week for the first semester, which in the first few meetings will be spent on the ground work for what is probably the most engaging and important phase ... designing your robot. The purpose of this guide is to educate the reader, our new battlebots members, on some key factors relating to designs of robots and analyzing the pros and cons. Often, new members try to design the perfect bot. However, designing the perfect robot is not possible. Everything has a disadvantage, a weakness that can be exploited. But that does not make it a bad design. It could be an effective one. However, it is important to consider all aspects of different types before determining what you will implement. This guide will also explore some ideas, and reasons behind that idea, that you can implement when designing your own bot. | Welcome to Battlebots! The environment of Battlebots will be fairly fast-paced. We only meet once a week for the first semester, which in the first few meetings will be spent on the ground work for what is probably the most engaging and important phase ... designing your robot. The purpose of this guide is to educate the reader, our new battlebots members, on some key factors relating to designs of robots and analyzing the pros and cons. Often, new members try to design the perfect bot. However, designing the perfect robot is not possible. Everything has a disadvantage, a weakness that can be exploited. But that does not make it a bad design. It could be an effective one. However, it is important to consider all aspects of different types before determining what you will implement. This guide will also explore some ideas, and reasons behind that idea, that you can implement when designing your own bot. | ||
| Line 117: | Line 118: | ||
For a better idea, a CAD example of a 3lb robot shows the layout and compactness of the interior after the electronics added. | For a better idea, a CAD example of a 3lb robot shows the layout and compactness of the interior after the electronics added. | ||
| − | [[File:ElectronicsLayout. | + | [[File:ElectronicsLayout.jpeg|320x240px]] |
| − | [[File: | + | [[File:ElectronicsLayout2.jpeg|320x240px]] |
| + | [[File:DrumLayout.png|320x240px]] | ||
There are a lot electrical components, including that wiring that is required, that goes into making your robot, which is why it was earlier advised to consider the an interior layout for the spacing for the electrical components. It is important to remember that, yes, these electronic components take a lot interior space. However, they also take up a lot of weight, approximately .85 pounds. | There are a lot electrical components, including that wiring that is required, that goes into making your robot, which is why it was earlier advised to consider the an interior layout for the spacing for the electrical components. It is important to remember that, yes, these electronic components take a lot interior space. However, they also take up a lot of weight, approximately .85 pounds. | ||
=== Weapon === | === Weapon === | ||
| − | + | ||
| + | [[File:weapon4.jpeg|thumb|left|100x100px]] | ||
| + | [[File:weapon1.jpeg|thumb|right|100x100px]] | ||
| + | [[File:weapon2.jpeg|thumb|right|100x100px]] | ||
| + | [[File:weapon3.jpeg|thumb|left|100x100px]] | ||
| + | |||
- Is your weapon short enough to avoid hitting its own body? | - Is your weapon short enough to avoid hitting its own body? | ||
- How are you planning on attaching your weapon to the chassis? | - How are you planning on attaching your weapon to the chassis? | ||
| Line 129: | Line 136: | ||
- Where is the pulley going to go and how is it attached to the weapon? | - Where is the pulley going to go and how is it attached to the weapon? | ||
- Is the dimension required for making your weapon/pulley available to be bought from our parts retailer? | - Is the dimension required for making your weapon/pulley available to be bought from our parts retailer? | ||
| − | - How heavy is your weapon? Typically, weapons weigh about one-third of the total weight of the bot. For example, for 3lb battlebots, an ideal weight for the weapon is in the range of .85lbs to .95lbs. | + | - How heavy is your weapon? Typically, weapons weigh about one-third of the total weight of the bot. For example, for 3lb battlebots, an ideal weight for the weapon is in the range of .85lbs to .95lbs. |
| + | |||
| + | The images provided are examples of just a few of the countless designs of horizontal bar spinner weapons. For more examples of other bot's weapons, including all types of bots, can be found in the [[List of 3lb Robots]]. | ||
| + | |||
| + | |||
| − | === | + | |
| + | |||
| + | ===Chassis=== | ||
| + | [[File:chassis.jpeg|thumb|right|320x240px]] | ||
- How big is your chassis? If its too small, it might conflict with interior space for the electronics. If its too large, it is just unnecessary weight, which you can use to allocated to other aspects of the bot; for example, the weapon. | - How big is your chassis? If its too small, it might conflict with interior space for the electronics. If its too large, it is just unnecessary weight, which you can use to allocated to other aspects of the bot; for example, the weapon. | ||
| − | - How are you chassis components attached together? Puzzle fitting the chassis parts have been commonly used among many battlebots designs. | + | - How are you chassis components attached together? Puzzle fitting the chassis parts have been commonly used among many battlebots designs. |
- Earlier, we brought up the topic of wheel attachments. Will the wheels be attached to the exterior of the bot or the interior of the bot? Interior wheel placements has an advantage when it comes to protecting the wheels. However, it will elongate your chassis, which will increase the weight of the chassis, but this can be solved by implementing weight relief. Exterior wheel placements are more prone to damage to the wheel. However, there are techniques to help avoid any damage to the wheels. For example, one way is to have an armor piece stretch over the wheel and around the entire robot. An example of interior and exterior wheel placements along with their respective armor solution are shown by the two iterations of the 3lb weight class battlebot, [[Chewi]]. | - Earlier, we brought up the topic of wheel attachments. Will the wheels be attached to the exterior of the bot or the interior of the bot? Interior wheel placements has an advantage when it comes to protecting the wheels. However, it will elongate your chassis, which will increase the weight of the chassis, but this can be solved by implementing weight relief. Exterior wheel placements are more prone to damage to the wheel. However, there are techniques to help avoid any damage to the wheels. For example, one way is to have an armor piece stretch over the wheel and around the entire robot. An example of interior and exterior wheel placements along with their respective armor solution are shown by the two iterations of the 3lb weight class battlebot, [[Chewi]]. | ||
- Is it out of the weapon's range? | - Is it out of the weapon's range? | ||
- As a suggestion, it is a good idea to have some sort of barricade in front of the chassis. This is just to prevent any sort of external components flying into your bot and damaging the electronics. Typically, since this front plate is used just to block entrance for external and unwanted materials, a thin piece of plastics should be more than sufficient for this task. You may think the front plate should be the same material as rest of the chassis, however plastic is stronger than many people realize. It is more than capable for this task and it will help reduce a lot of weight rather than using the same material as the rest of the chassis. | - As a suggestion, it is a good idea to have some sort of barricade in front of the chassis. This is just to prevent any sort of external components flying into your bot and damaging the electronics. Typically, since this front plate is used just to block entrance for external and unwanted materials, a thin piece of plastics should be more than sufficient for this task. You may think the front plate should be the same material as rest of the chassis, however plastic is stronger than many people realize. It is more than capable for this task and it will help reduce a lot of weight rather than using the same material as the rest of the chassis. | ||
| + | |||
| + | For a better visual of what puzzle fits and a complete chassis looks like, an example image is provided to the right | ||
The electronics plus the weapon, together, make up more than half the restricted weight limit for the 3lb class. The remainder weight plays an important factor to the dimensions/amount of weight reliefs required for the chassis. | The electronics plus the weapon, together, make up more than half the restricted weight limit for the 3lb class. The remainder weight plays an important factor to the dimensions/amount of weight reliefs required for the chassis. | ||
| − | |||
| − | |||
Latest revision as of 00:12, 4 July 2020
Contents
Overview
Welcome to Battlebots! The environment of Battlebots will be fairly fast-paced. We only meet once a week for the first semester, which in the first few meetings will be spent on the ground work for what is probably the most engaging and important phase ... designing your robot. The purpose of this guide is to educate the reader, our new battlebots members, on some key factors relating to designs of robots and analyzing the pros and cons. Often, new members try to design the perfect bot. However, designing the perfect robot is not possible. Everything has a disadvantage, a weakness that can be exploited. But that does not make it a bad design. It could be an effective one. However, it is important to consider all aspects of different types before determining what you will implement. This guide will also explore some ideas, and reasons behind that idea, that you can implement when designing your own bot.
Types of Robots
The first step of designing your robot is to decide what type you want to build. There have been several different designs throughout the history of battlebots and competitions. However, this guide will cover some of the generic designs that show up consistently each year in competition. It is important to keep in mind that each type of robot has their own advantages. However, it goes without saying that they also have their disadvantages and difficulties.
Drum Spinners
Drum bots have a rotating cylindrical-shaped weapon (medium to large sized) usually attached with barbs or teeth attached to the cylindrical weapon to tear apart and flip opponent's bot. Drum bots are a good bot type for beginners and are quite common for new 3lb members to use as their first type.
Advantages
Drums, as mentioned, are a great bot for beginners. Their weapon is simple, yet quite reliable and destructive upon certain hits. Drum's weapons are generally sturdy because they are usually made from a block of metal, which means that it will be difficult for it to break. They allow your bot to be stable when you are attacking an opponent bot, dealing several quick and continuous attacks. If correctly designed, drums are capable of launching or flipping the opponent bots in the air. If your opponent's bot is not invertible and they get flipped, it is more than likely that they wont be able to continue and you will emerge victorious in that match. Speaking of invertibility, drums can be designed to be invertible which gives you an advantage when you get flipped.
Disadvantages
Because the nature of the weapon, Drum spinner bots generally have a very small strike zone. The heavy mass in the front of the bot rotating at high RPM will making driving your bot fairly difficult. Sometimes, with powerful weapons at high RPM, the gyroscopic forces acting on the bot could cause lift to occur on one side of the bot when turning. Similar to Horizontal/Vertical Bar Spinners, upon your weapon's contact on an opponent bot, the recoil from the impact could potentially cause damage to your own bot, sometimes making it immobile. If not properly designed or built, as with any heavy hitting weapon type, the weapon could be ripped apart. The weapon is generally sturdy, however, after direct attacks from opponent bot or extended contact, it is likely for your weapon to be damaged and will be less effective.
| TL:DR: Summary (Drum Spinners) | ||
|---|---|---|
| Advantages | Disadvantages | |
| Sturdy weapon | Small strike zone | |
| Powerful weapon capable of flipping opponent bot | Gyroscopic effects cause control and turning issues | |
| Could be designed invertible | Potential self-inflicting damage | |
| High damage output | Weapon could get ripped off / damaged |
Horizontal Spinners
Briefly, there are two common variations to spinners: bar spinners and disk spinners. Bar spinners are similar to disk spinners, except, as stated in the name, the weapons of bar spinners are shaped like a bar. The robot's weapon motor is a factor that determines the effectiveness of the weapon of spinners. The structure of the weapon system is similar to that of a drum spinner, where the weapon's spin up is controlled by the weapon motor, commonly connected by a pulley system. Horizontal Bar spinners are commonly known for their destructive power. Weapons of this types enable both offensive, as well as defensive, advantage (explained in "Advantages").
Advantages
The body of the bar spinners are generally similar. However, the uniqueness of the bot comes with the weapon design. This weapon types offers very versatile weapons, meaning that there can be many variations to it. Bar either be single-edged or multi-edged where the hitting edge could be (one or more combinations of) a blunted edge, sharp-bladed edges, or spiked edges, and so on. The more edges of contact you have, the damage will lose effectiveness. For example, a single-edged weapon, upon weapon's contact, will not have interference until its next contact. This allows more spin up, which maximizes damage per hit. However, with multi-edged weapon, the more edges there are, the weapon will have difficulty with spinning the weapon because it has more than one edge that will make contact, which will slow the weapon speed upon each contact. However, this is not necessarily a bad thing because multi-edges will hit more frequently, doing decreasing damage upon each hit. Regardless of the design, bar spinners have a large strike zone, much greater than drum spinners, and if made properly, the weapon can be highly destructive. Similar to the drum spinners, horizontal bar spinners can be designed to be invertible, which will make it more difficult for the opponent to try and defeat you. The gyroscopic forces at high to to full speed of a horizontal bar spinner, depending on size and power of the weapon, can help stabilize your robot and stop it self from being flipped over.
Disadvantages
Because of the design of the weapon and its front placement, robot must be designed to where the front (where the weapon system is held) is elongated from the main body of the robot. This is because you need to have it designed so that the the robot does not get hit by its own weapon. Generally, regardless of the design, the weapon is powerful and it does a lot of damage. However, this is could also be disadvantageous. Generally, a lot of the weight for this robot type is focused on the weapon. Its also important to keep in mind that the structure of the robot itself needs to be strong. Upon a hit, your robot, more than likely will experience recoil. If your robot is not structurally strong over all, parts of your bot, including your electronics, could be adversely affected. Not only can recoil potentially harm your robot, it could also affect your driving ability. Upon contact it could redirect your robot in a different direction. In some cases, it could cause your robot to go airborne and/or be flipped over, but it is every easy to design your robot to be invertible. Gyroscopic effects caused by the spinning of the heavy weapon can cause an issues with driving abilities. The robot will want to turn in the opposite direction from the direction that your weapon is spinning. However, driving ability stabilizes as the weapon spins at high to full speed. Like the drum spinner, the weapon is attached using a pulley system that connects it to the weapon motor using a belt. Impacts could damage your belt, which could cause weapon failure. If your weapon or weapon system fails in some way, or if your belt spinning your weapon fails in some way, your bot will no longer have a functioning weapon. Usually, this is the only weapon your robot is equipped with, so there is no secondary weapon. If you end up with an inactive weapon, it is more than likely that you will lose that match.
| TR:DL Summary (Horizontal Spinners) | ||
|---|---|---|
| Advantages | Disadvantages | |
| Effective type + type advantage against most other types | Weapon could hit chassis (FIX: elongated front) | |
| Versatile weapon designs with variable edges for max speed and power | Gyroscopic effects cause control and turning issues (No longer a problem at higher rotations) | |
| Weapons acts offensively and defensively | Recoil effects upon weapon's impact | |
| invertible design | Could get redirected or flipped upon impact (FIX: invertible design) | |
| larger attack zone | Weapon could get ripped off / weapon failure due to damage to the belt | |
| High damage output (one of the highest of all types) |
Mobility and Defense
Wedges
As you may recall, wedges are one of the most common implemented designs. Remember, wedges do not have actual weapons. Because it does not have a weapon, which normally would take up majority of the robot's weight, it allows for a stronger structural design of the robot or for the use of better (or more) drive motors for better mobility, maybe a combination of both.
The big picture of wedges is to temporarily (or, in some cases, permanently) disable the opponents mobility. In other words, your "weapon" is the wedge that tries to get under the opponent's robot. Once this is done, they will lose traction, thus their mobility. In some cases, the opponent's bot will be flipped. At that point, you have control of that match. If your opponent's bot is not invertible or has no self-right mechanism, it is more than likely that you won that match. In order to get under the robot, the easiest way to achieve this is to design your wedge, varying the bot's height and size of the wheels, such that it is as close to the ground as possible. It goes with out saying, this tactic of getting under the opponent requires a strong drive system, which is made possible by the weight saved by not having a weapon.
A wedge bot will find racking up points to win to be difficult. It is possible to include spikes, on either the wedge or its body as a defense mechanism (while also potentially dealing very limited offensive damage). The potential tradeoff, depending on the how you implement this addition to the design, is that it may or may not be possible to make your robot be invertible.
The concept seems pretty simple and straightforward, however it turns out to be pretty effective type when put to use. They have a type advantage against most other bot types. In other words, as long as your wedge can get under an opponent bot, you have some advantage. Pretty much the only counter type to a wedge bot are types such as undercutters, lifters, other wedges; basically anything that is closer to the ground than your type. In some instances, vertical spinners could pose a threat as well.
Component Design/Placement
Be careful on where you place certain things. There are things to consider while you are initially designing your bot. For example, is your weapon far enough to where it wont hit the body? How do you want to incorporate your wheels, attached inside the body or attached to outside of the robot? If it is inside the wheels, how will it affect the overall layout, including the electronic layout of the bot? How will locations of certain object placements affect the center of gravity? Small things like this can have a bigger impact of the robot as a whole.
Do not underestimate the space that wires could take up. Wire management, in many battlebots member's experience, is one of the most difficult things to overcome. This is usually one of the last phases of completion, so wiring would happen at the end (closer to the time of competition). If you dont want to get to this phase and figure you have to redo wiring and rework the wire management to a more tightly packed system, it is recommended that you consider this during the design phase, giving enough room in the bot.
Important things to consider during design process includes, but no limited to the following (some are restated as above):
Electronics
For more accurate and detailed information, i.e. images, weights, dimensions, and models, there is table under the Standard Robot Components in a different RoboJackets Wikipedia page 3lb Beginner's Guide
The electronics on the robot comprises of the following:
One 11.1 volt, three-cell power supply to power the other electrical components.
Two drive motors, one for each wheel to drive the robot and two drive electronic speed controllers (Drive ESC) that support and control the weapon motor.
One weapon motor that spins up the weapon with the help of one weapon ESC
For a better idea, a CAD example of a 3lb robot shows the layout and compactness of the interior after the electronics added.
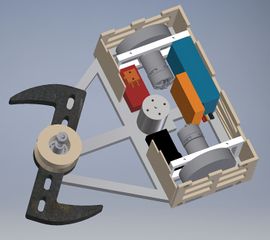
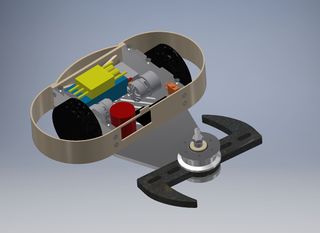
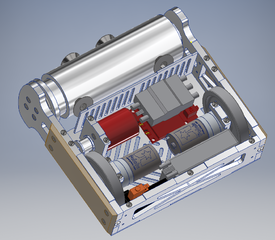
There are a lot electrical components, including that wiring that is required, that goes into making your robot, which is why it was earlier advised to consider the an interior layout for the spacing for the electrical components. It is important to remember that, yes, these electronic components take a lot interior space. However, they also take up a lot of weight, approximately .85 pounds.
Weapon
 - Is your weapon short enough to avoid hitting its own body?
 - How are you planning on attaching your weapon to the chassis?
 - What materials are incorporated in the weapon assembly?
 - Where is the pulley going to go and how is it attached to the weapon?
 - Is the dimension required for making your weapon/pulley available to be bought from our parts retailer?
 - How heavy is your weapon? Typically, weapons weigh about one-third of the total weight of the bot. For example, for 3lb battlebots, an ideal weight for the weapon is in the range of .85lbs to .95lbs.
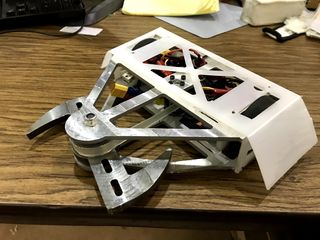
The images provided are examples of just a few of the countless designs of horizontal bar spinner weapons. For more examples of other bot's weapons, including all types of bots, can be found in the List of 3lb Robots.
Chassis
- How big is your chassis? If its too small, it might conflict with interior space for the electronics. If its too large, it is just unnecessary weight, which you can use to allocated to other aspects of the bot; for example, the weapon.
- How are you chassis components attached together? Puzzle fitting the chassis parts have been commonly used among many battlebots designs.
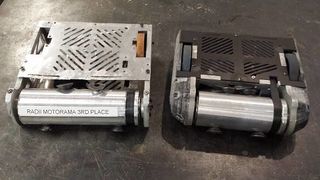
- Earlier, we brought up the topic of wheel attachments. Will the wheels be attached to the exterior of the bot or the interior of the bot? Interior wheel placements has an advantage when it comes to protecting the wheels. However, it will elongate your chassis, which will increase the weight of the chassis, but this can be solved by implementing weight relief. Exterior wheel placements are more prone to damage to the wheel. However, there are techniques to help avoid any damage to the wheels. For example, one way is to have an armor piece stretch over the wheel and around the entire robot. An example of interior and exterior wheel placements along with their respective armor solution are shown by the two iterations of the 3lb weight class battlebot, Chewi.
- Is it out of the weapon's range?
- As a suggestion, it is a good idea to have some sort of barricade in front of the chassis. This is just to prevent any sort of external components flying into your bot and damaging the electronics. Typically, since this front plate is used just to block entrance for external and unwanted materials, a thin piece of plastics should be more than sufficient for this task. You may think the front plate should be the same material as rest of the chassis, however plastic is stronger than many people realize. It is more than capable for this task and it will help reduce a lot of weight rather than using the same material as the rest of the chassis.
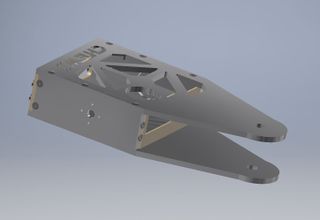
For a better visual of what puzzle fits and a complete chassis looks like, an example image is provided to the right
The electronics plus the weapon, together, make up more than half the restricted weight limit for the 3lb class. The remainder weight plays an important factor to the dimensions/amount of weight reliefs required for the chassis.
