Difference between revisions of "RC13-KickerChipper"
Jump to navigation
Jump to search
| (33 intermediate revisions by 5 users not shown) | |||
| Line 1: | Line 1: | ||
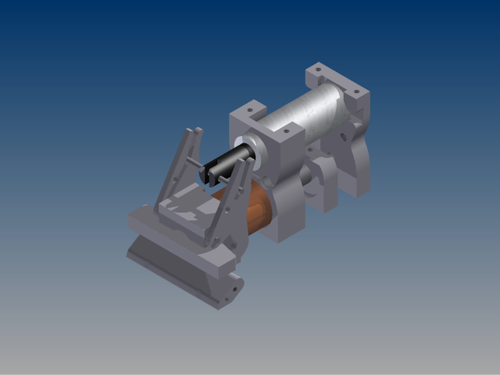
The Kicker-Chipper of the 2013 is very similar to the RC09 KickerChipper which can be seen at [[RC09-KickerChipper]] | The Kicker-Chipper of the 2013 is very similar to the RC09 KickerChipper which can be seen at [[RC09-KickerChipper]] | ||
| − | [[File:Kicker-Chipper13_rendering.bmp|500px|right]] | + | [[File:Kicker-Chipper13_rendering.bmp|500px|right|]] |
| + | ==Drawings== | ||
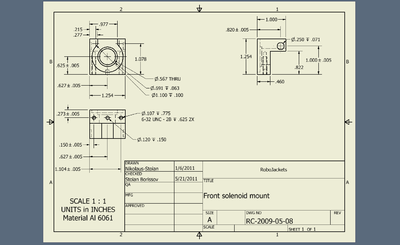
| + | [[File:Front_solenoid_mount_drawing.bmp|400px]] | ||
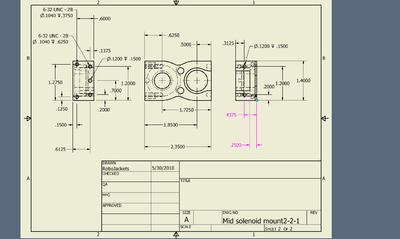
| + | [[File:Mid_Solenoid_Mount_Drawing.bmp|400px|]] | ||
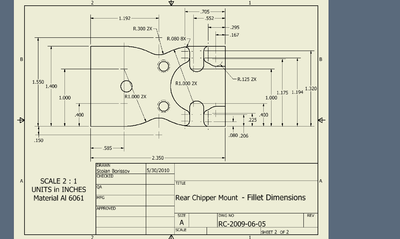
| + | [[File:Rear_Chipper_Mount.bmp|400px|]] | ||
==Parts & Components== | ==Parts & Components== | ||
Amounts are based on per robot. Materials are in sizes for prototyping not lowest cost per amount. | Amounts are based on per robot. Materials are in sizes for prototyping not lowest cost per amount. | ||
| Line 87: | Line 91: | ||
==Manufacturing and Assembly== | ==Manufacturing and Assembly== | ||
| − | === | + | === Tools=== |
| + | #CNC Mill (3 axis is preferred though possible to do with 2 axis) | ||
| + | #Lathe | ||
| + | #Waterjet | ||
| + | #Taps | ||
| + | === Fabrication === | ||
| + | |||
| + | #Use the waterjet to cut the chipper arm sheet metal | ||
| + | #The 3 axis CNC Mill is used to create the chipper boot; kicker boot; front,mid and rear mounts, and the plunger stabilizer. | ||
| + | ##When milling the front solenoid mount make sure to put in the bushing in the pocket first before you mill the section. | ||
| + | #Use the lathe and mill to create plunger. | ||
| + | ##To do this, first create a hole in the both steel and stainless steel shafts with the lathe. | ||
| + | ##Thread holes with a 10-32 tap and attach both shafts with the set screw. Use retaining compound on the set screw. | ||
| + | ##Now turn down the created shaft with lathe to the desired diameter. | ||
| + | ##Cut Shaft to desired length. | ||
| + | ##Use the mill to mill down the shaft to accommodate the kicker boot. | ||
| + | #Rip off the casing of the push type solenoid to get the coil. | ||
| + | [[Category: RC Mechanical]]<br/>[[Category:2012-2013]] | ||
Latest revision as of 19:52, 24 May 2020
The Kicker-Chipper of the 2013 is very similar to the RC09 KickerChipper which can be seen at RC09-KickerChipper
Contents
- 1 Drawings
- 2 Parts & Components
- 2.1 Stock
- 2.1.1 Chipper Solenoid
- 2.1.2 Kicker Solenoid
- 2.1.3 Steel Magnetic Kicker Plunger
- 2.1.4 Non Magnetic Stainless steel Kicker Plunger
- 2.1.5 Kicker Bronze Bushing
- 2.1.6 Chipper Arm Ball Bearing
- 2.1.7 Front Solenoid Mount
- 2.1.8 Middle Solenoid Mount
- 2.1.9 Rear Solenoid Mount
- 2.1.10 Plunger Stabilizer
- 2.1.11 Kicker Set Screw
- 2.1.12 Chipper Arm Ball Bearing
- 2.1.13 Chipper Arm Connector
- 2.1 Stock
- 3 Manufacturing and Assembly
Drawings
Parts & Components
Amounts are based on per robot. Materials are in sizes for prototyping not lowest cost per amount.
Stock
Chipper Solenoid
- Vendor - Solenoid City
- Part No. - S-20-90-24
- Cost - $38.26
- Description - Chipper Solenoid S-20-90-24
Kicker Solenoid
- Vendor - Solenoid City
- Part No. - S-29-150-20HF
- Cost - $93.93
- Description - Kicker Solenoid S-29-150-20HF
Steel Magnetic Kicker Plunger
- Vendor - McMaster-Carr
- Part No. - 9120K15
- Cost - $9.67
- Description - Zinc-Galvanized Low-Carbon Steel Rod 1/2" Diameter, 3' Length
Non Magnetic Stainless steel Kicker Plunger
- Vendor - Speedy Metals
- Part No. - 4r.5-18
- Cost - $6.55
- Description - 1/2" Rod 304 Stainless Steel,Cold Finished, Annealed-18"
Kicker Bronze Bushing
- Vendor - McMaster-Carr
- Part No. - 6338K462
- Cost - $0.91
- Description - SAE 841 Bronze Flanged-Sleeve Bearing for 7/16" Shaft Diameter, 9/16" OD, 1/2" Length
Chipper Arm Ball Bearing
- Vendor - Grainger
- Part No. - 1ZEH7
- Cost - $7.69
- Description - Mini Ball Bearing,Flanged,Bore 0.1250 In
Front Solenoid Mount
- Vendor - McMaster-Carr
- Part No. - 9008K461
- Cost - $20.35
- Description - Multipurpose Aluminum (Alloy 6061) 1-1/2" Square, 1' Length
Middle Solenoid Mount
- Vendor - McMaster-Carr
- Part No. - 9246K51
- Cost - $36.66
- Description - Multipurpose Aluminum (Alloy 6061) 3/4" Thick, 8" X 8"
Rear Solenoid Mount
- Vendor - McMaster-Carr
- Part No. - 9246K21
- Cost - $21.34
- Description - Multipurpose Aluminum (Alloy 6061) 3/8" Thick, 8" X 8"
Plunger Stabilizer
- Vendor - McMaster-Carr
- Part No. - 9246K21
- Cost - $21.34
- Description - Multipurpose Aluminum (Alloy 6061) 3/8" Thick, 8" X 8"
Kicker Set Screw
- Vendor - McMaster-Carr
- Part No. - 92311A243
- Cost - $5.28
- Description - SS Cup Point Socket Set Screw 10-24 Thread, 5/8" Length
Chipper Arm Ball Bearing
- Vendor - Grainger
- Part No. - 1ZEH7
- Cost - $7.69
- Description - Mini Ball Bearing,Flanged,Bore 0.1250"
Chipper Arm Connector
- Vendor - McMaster-Carr
- Part No. - 90145A451
- Cost - $11.05
- Description - 18-8 Stainless Steel Dowel Pin 3/32" Diameter, 2" Length
Manufacturing and Assembly
Tools
- CNC Mill (3 axis is preferred though possible to do with 2 axis)
- Lathe
- Waterjet
- Taps
Fabrication
- Use the waterjet to cut the chipper arm sheet metal
- The 3 axis CNC Mill is used to create the chipper boot; kicker boot; front,mid and rear mounts, and the plunger stabilizer.
- When milling the front solenoid mount make sure to put in the bushing in the pocket first before you mill the section.
- Use the lathe and mill to create plunger.
- To do this, first create a hole in the both steel and stainless steel shafts with the lathe.
- Thread holes with a 10-32 tap and attach both shafts with the set screw. Use retaining compound on the set screw.
- Now turn down the created shaft with lathe to the desired diameter.
- Cut Shaft to desired length.
- Use the mill to mill down the shaft to accommodate the kicker boot.
- Rip off the casing of the push type solenoid to get the coil.


